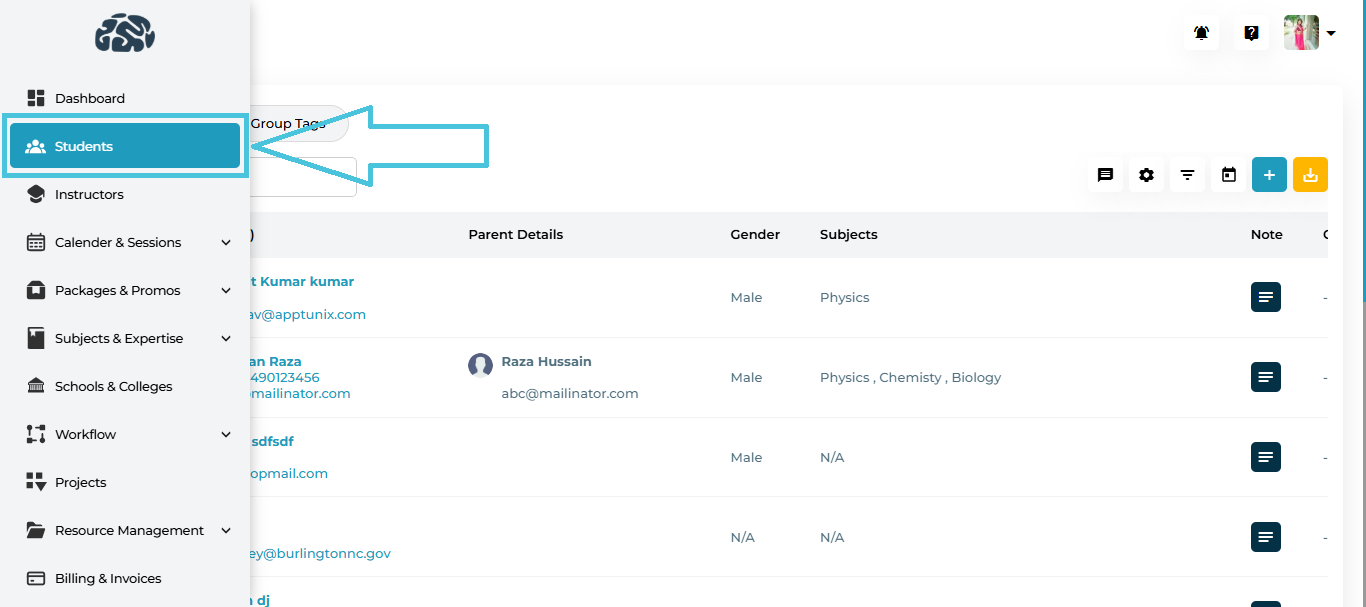
From the left sidebar, go to Students → Student Profiles.
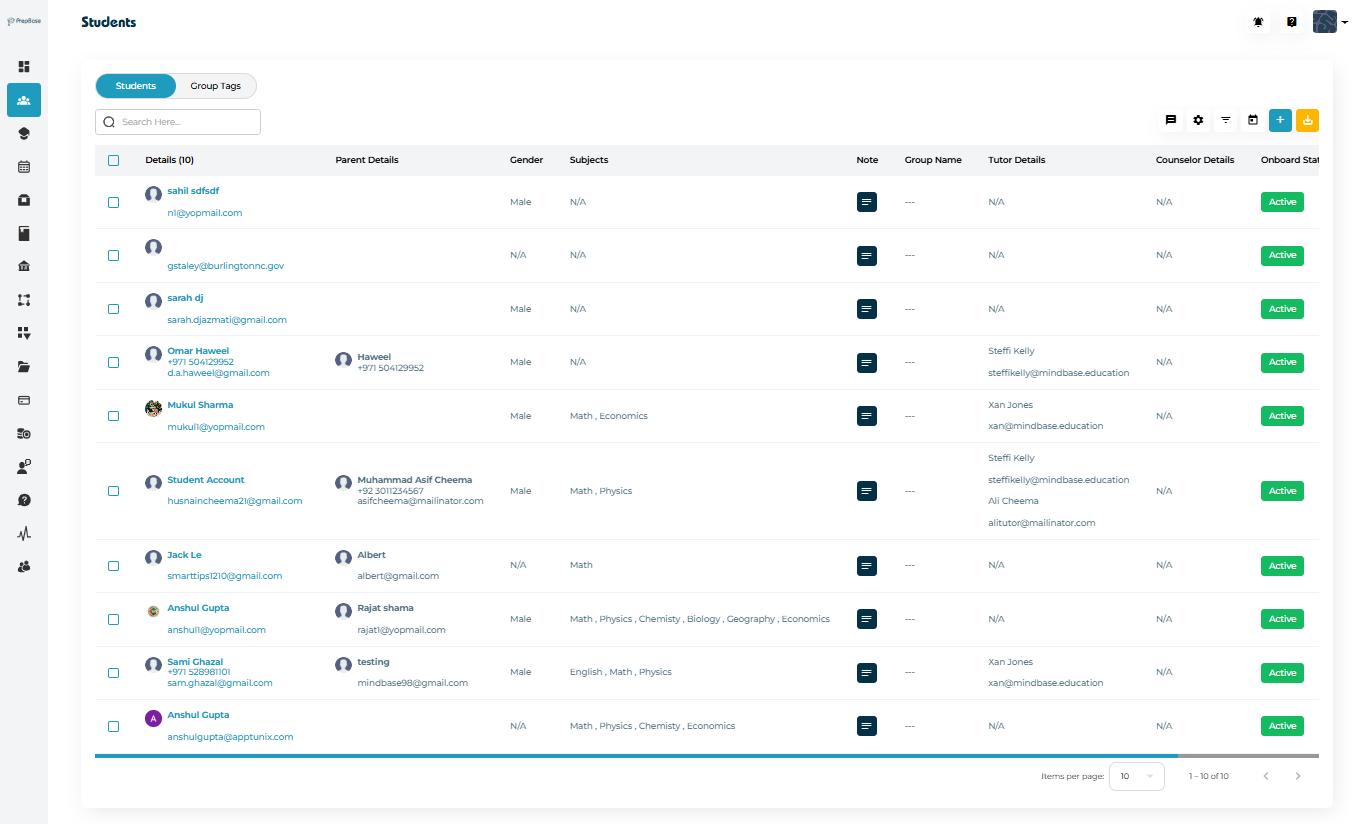
You’ll land on the main student list view that displays all registered student accounts.
| Column | What it shows |
|---|---|
| Details | Student name + email + phone. (Click name to open the record.) |
| Parent Details | Linked parent/guardian name + contact. |
| Gender | Student gender. |
| Subjects | Enrolled or interested subjects. |
| Note | This can only be added by admin and this is a private note visible to admin only. |
| Group Name | Group Tag (if any). |
| Tutor Details | Assigned tutor name + email. |
| Counselor Details | Assigned counselor (if any). |
| Onboard Status | Current status (Active/In active/Lead/Trial). |
| Onboard Date | Date the student was onboarded. |
| ⋮ (three dots) | Row actions (View, Delete). |

| Actions | Description |
|---|---|
| Email / SMS | Send bulk Email or bulk SMS to selected students. |
| Settings (Bulk Actions) | Assign tutor/counselor/package, add file/note/to-do, assign to project (for selected students). |
| Filters | Filter by Status, Instructor, Group. |
| Calendar | Filter by onboarding date range. |
| Add new Student | Add New student or Import CSV. |
| Export CSV | Export the current list (respecting filters). |

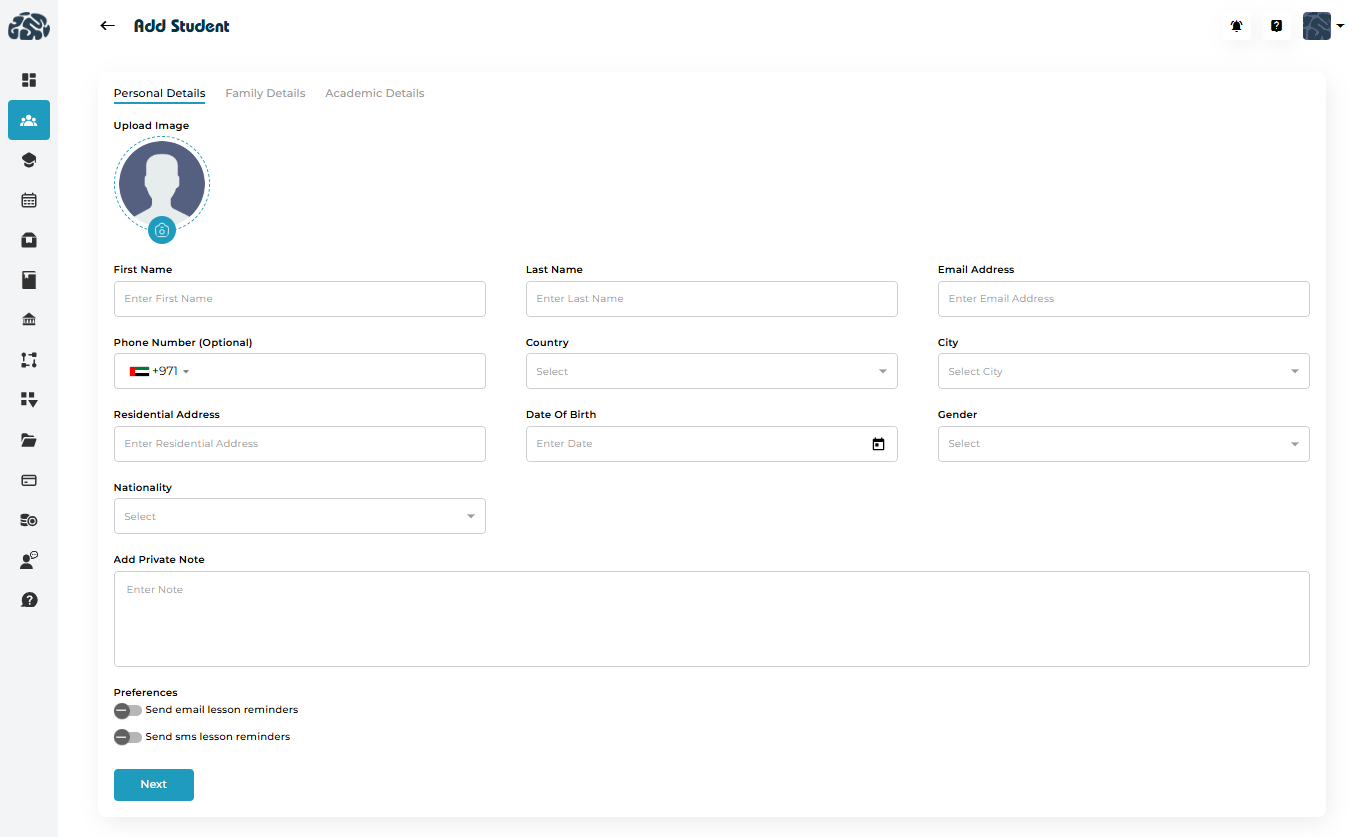
You’ll see the Add Student Wizard, divided into three sections:
1. Personal Details
| Field | Description |
|---|---|
| Upload Image | Profile photo (optional). |
| First Name / Last Name | Student’s full name. |
| Email Address | Login/primary contact email (unique). |
| Phone Number | Optional student phone. |
| Country / City | Location selectors. |
| Residential Address | Address for records. |
| Date of Birth / Gender / Nationality | Identity and reporting fields. |
| Add Private Note | Internal admin-only note. |
| Preferences | Toggle Send email lesson reminders / Send SMS lesson reminders. |
2. Family Details (optional)

| Field | Description |
|---|---|
| Parent/Guardian Name | Full name of parent/guardian. |
| Phone Number | Primary parent phone. |
| Emergency Contact (Optional) | Secondary phone for emergencies. |
| Email Address | Parent email address. |
| Relationship | Mother, Father, Guardian, etc. |
| Address | Parent address. |
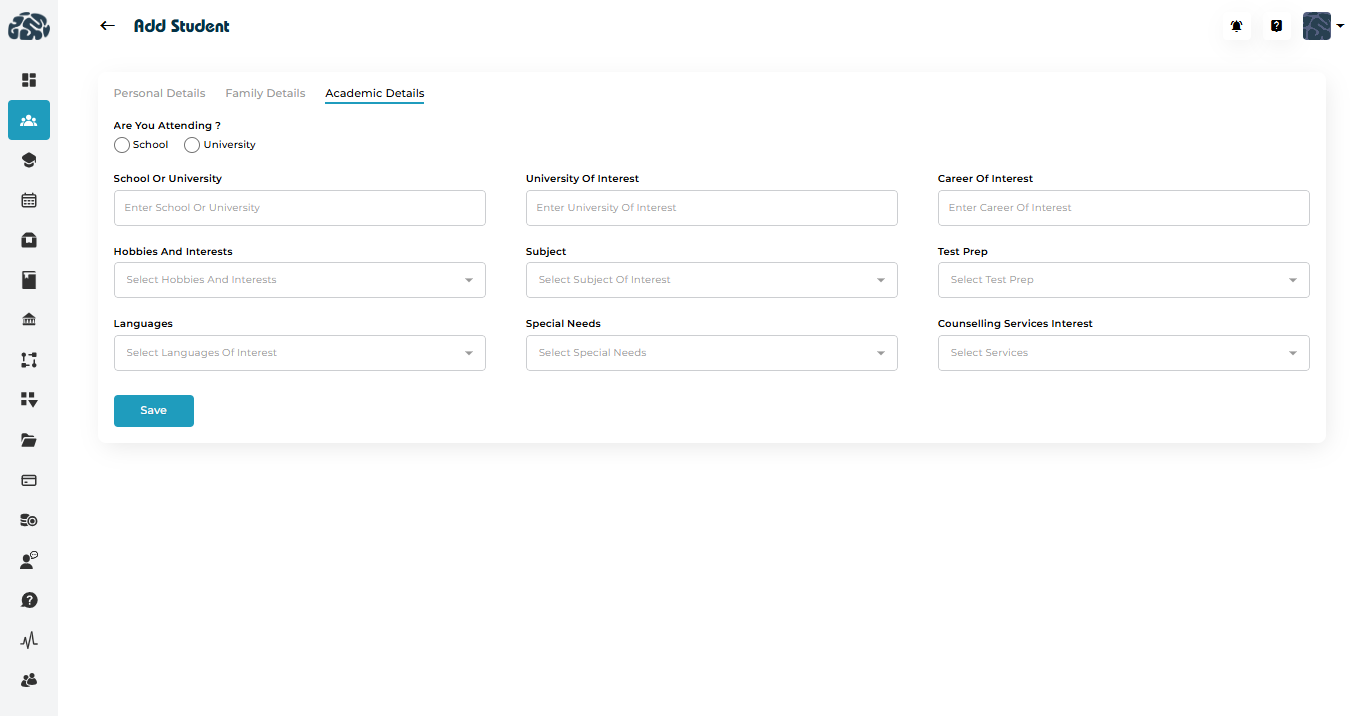
3. Academic Details
| Field | Description |
|---|---|
| Are You Attending? (School / University) | Select whether the student is currently studying in a school or a university. This selection also helps tailor the fields and services relevant to their academic stage. |
| Grade or Year | Choose the student’s current school grade or university year. This helps match them with suitable tutors and academic programs. |
| Curriculum or Major | Select the curriculum the student is following (e.g., British, American, IB, CBSE, etc.) or their university major. |
| School or University | Enter the name of the school or university the student is currently attending. |
| University of Interest | Specify universities the student is aiming for in the future. Useful for admission counseling and long-term planning. |
| Career of Interest | Enter the career paths the student is interested in pursuing (e.g., Engineering, Medicine, Business, etc.). |
| Hobbies and Interests | Select extracurricular interests (e.g., music, sports, arts). Helps in personalized profile development. |
| Subject | Choose the subjects the student wants tutoring or academic help with. |
| Test Prep | Select the standardized tests the student wants help preparing for (e.g., SAT, ACT, IELTS, TOEFL). |
| Languages | Select the languages the student is interested in learning or improving. |
| Special Needs | Identify any learning needs or conditions that require special academic attention. |
| Counselling Services Interest | Select the types of counseling services the student is interested in (e.g., academic counseling, career guidance). |
| Save | Click to save all entered academic details to the student’s profile. |
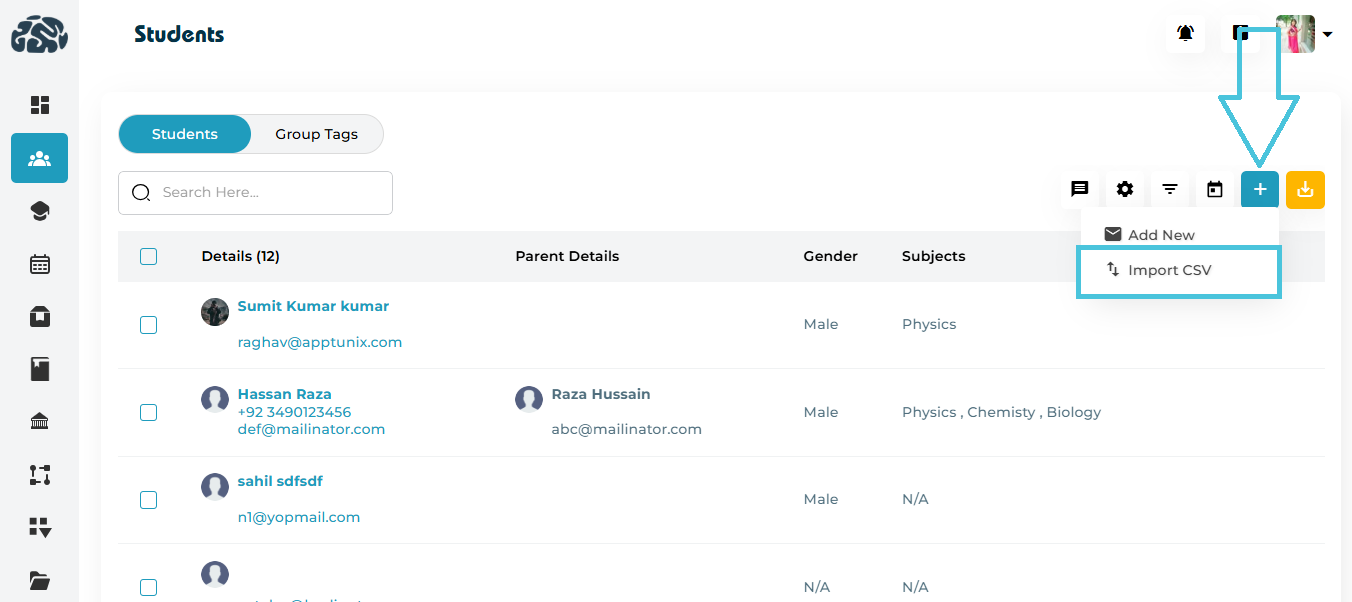
Admins can bulk-upload multiple student records using the Import option.
- Click ➕ → Import CSV.
Download the sample CSV template.
Fill the file with student data following the template headers.
Upload the completed file and review the preview table.
Submit to finalize the import.
Template Guidelines
Column Description Required First Name Student’s given name ✅ Last Name Student’s surname ✅ Email Primary contact email ✅ Country Country of residence ✅ Nationality Country of citizenship ✅ Gender Male or Female ✅ DOB Enter date of birth ✅ Once imported, open each profile to verify details and complete any missing optional information.
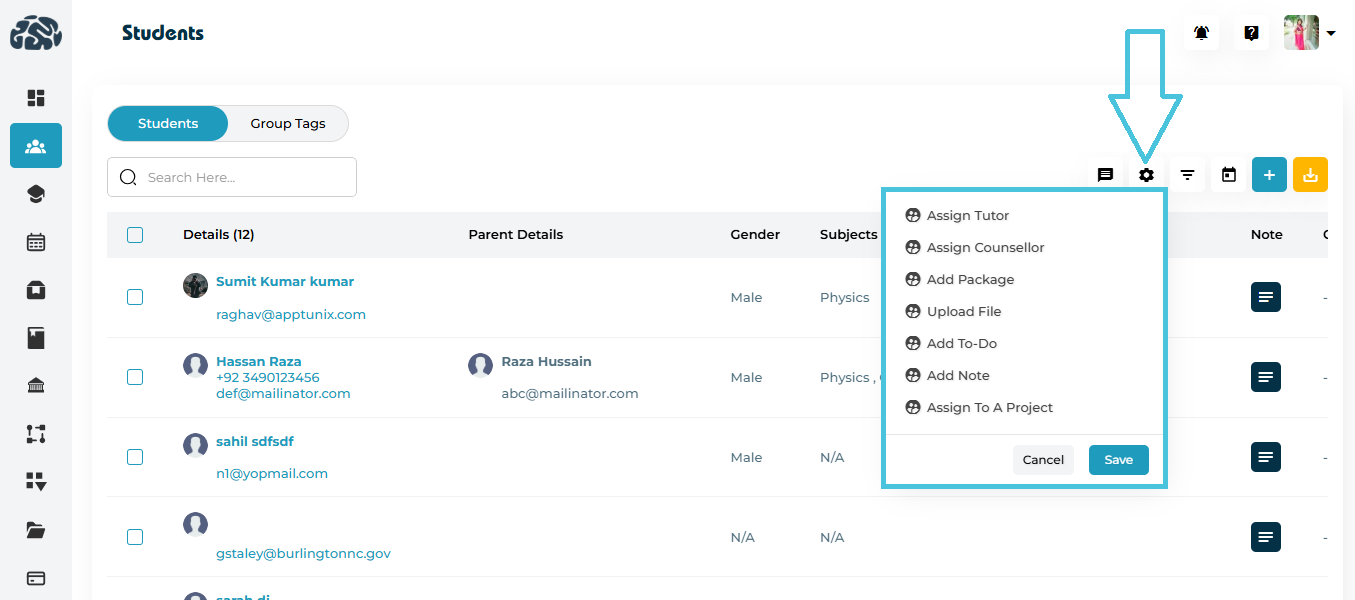
Important: All bulk actions require you to select students via checkboxes first.
| Action | Description |
|---|---|
| Assign Tutor | Assigns the same tutor to all selected students. Opens a popup, select the tutor, click Save, and a success message confirms the update. Tutor details will appear under the Tutor Details section. |
| Assign Counselor | Assigns a counselor to the selected students. Opens a popup, choose the counselor, click Save, and a success message confirms the update. |
| Add Package | Adds a tutoring/counseling package to each selected student. Opens a popup, choose the package, click Save, and a success message appears. An invoice is automatically sent to each student for the added package and updates the family account under the Billing & Invoices tab in the admin panel. Remaining hours are updated in the Packages tab. |
| Upload File | Uploads a file (such as syllabus or notes) for all selected students. Opens a popup, with the visibility set for the selected students only, click Save, and a success message confirms the upload. The file appears under each student’s Files tab. |
| Add To-Do | Creates a task for the selected students. Opens a popup, add title, due date, and priority, click Save, and a success message appears. The task shows under the To-Do tab. |
| Add Note | Adds a note to all selected students. Opens a popup, enter note text, select visibility to choose if the note will be viewable by admin only, student, parent, or both student and parent, click Save, and a success message confirms completion. The note appears based on the visibility chosen — it is not admin-only by default. |
| Assign to a Project | Enrolls all selected students into a specific project. Opens a popup, choose the project, click Save, and a success message confirms the assignment. The project appears under the Projects tab. |
Steps for any Bulk Action
Select students using the checkboxes.
Click ⚙️ Settings → choose the required action.
Complete the confirmation popup (pick tutor/counselor/package/file/note/to-do/project).
Click Save → wait for the success toast.
Verify changes in the relevant column/tab.
The Group Tags feature helps organize students into logical categories for easy management, progress tracking, and reporting.
Admins can create tags for batches, classes, or interest groups — for example, “Physics 12th,” “IELTS Prep,” or “Fall 2025 Intake.”
Each tag can include one or more students and display their assigned tutors or counselors, helping the admin quickly identify groups and their participants.
Accessing Group Tags
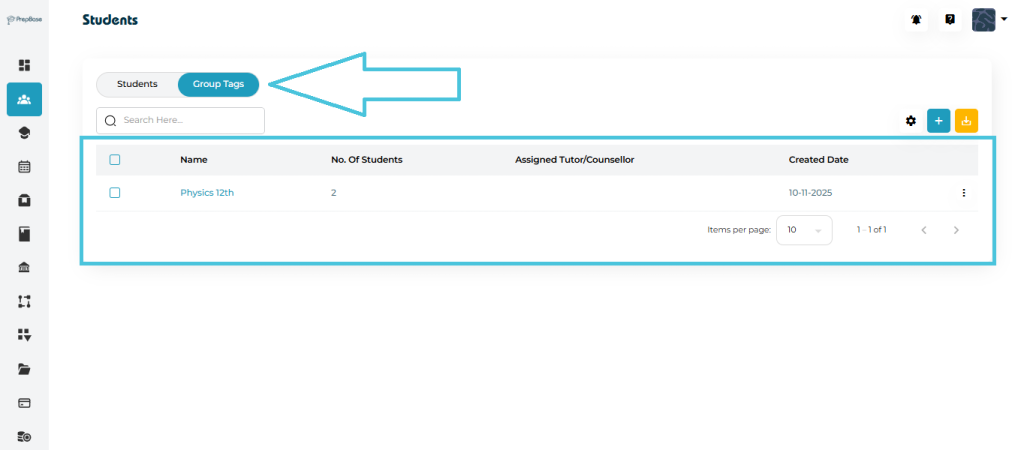
Navigate to Students → Group Tags tab.
Here, you’ll see a list of all existing tags, including:
Name of the group
Number of Students under it
Assigned Tutor or Counselor
Created Date
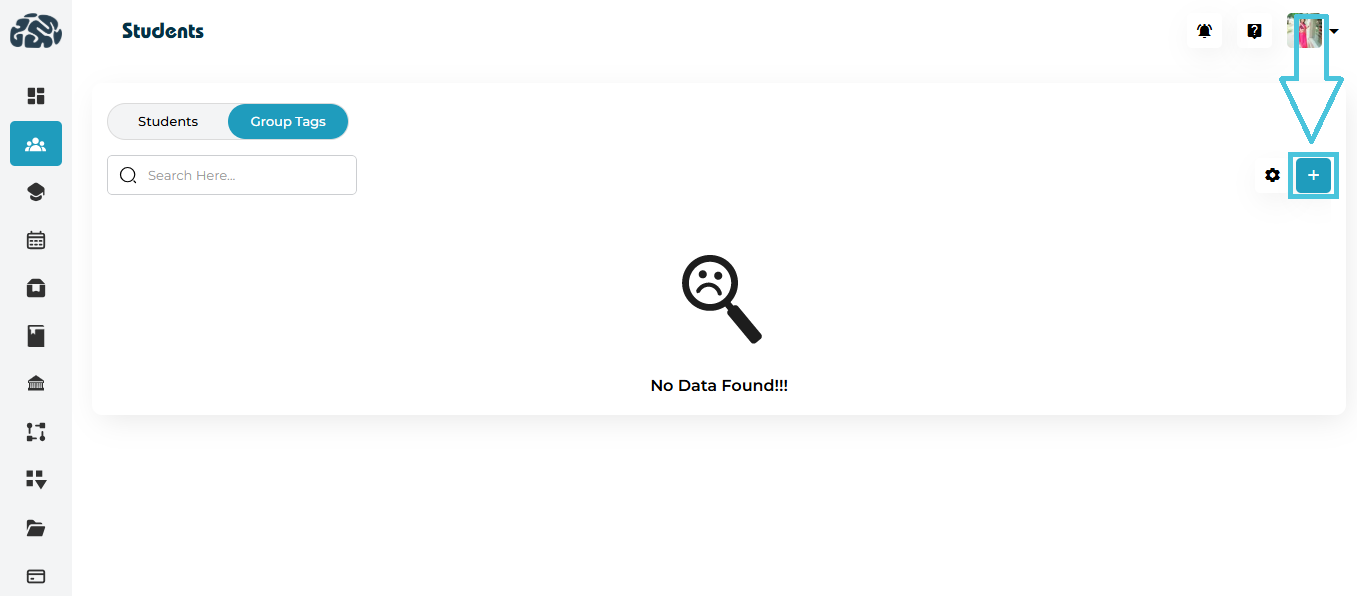
If no tags exist, the page will display a “No Data Found” message with a ➕ Add button.
Creating a New Group Tag

To create a new group tag:
Click the ➕ icon at the top-right corner of the Group Tags page.
A popup window titled “Group Tag” will appear.
Fill in the following details:
| Field | Description |
|---|---|
| Group Name | Enter the name of the group (e.g., Physics 12th) |
| Group Name in Arabic | Optional – Arabic version of the group name |
| Description | Add details about the group’s purpose (e.g., “Students enrolled in 12th Grade Physics classes.”) |
| Description (AR) | Optional Arabic translation of the description |
| Color | Choose a tag color to easily identify groups in the list |
| Select Students | Start typing to search and select students to include in this group |
4. Click Save to create the group.
Once saved, the new tag will appear in the Group Tag list along with its associated students and tutors or counselors.
Managing Group Tags
After creation, you can:
View Students: Click on the tag name (e.g., Physics 12th) to see all students assigned to that tag.
Edit Tag Details: Use the action menu (three dots) to update the name, description, or student assignments.
Delete Tag: Remove a tag if it’s no longer needed.
Group Tags are an efficient way to segment students for easier communication, tutor or counselor tracking, and performance monitoring across batches or interests.
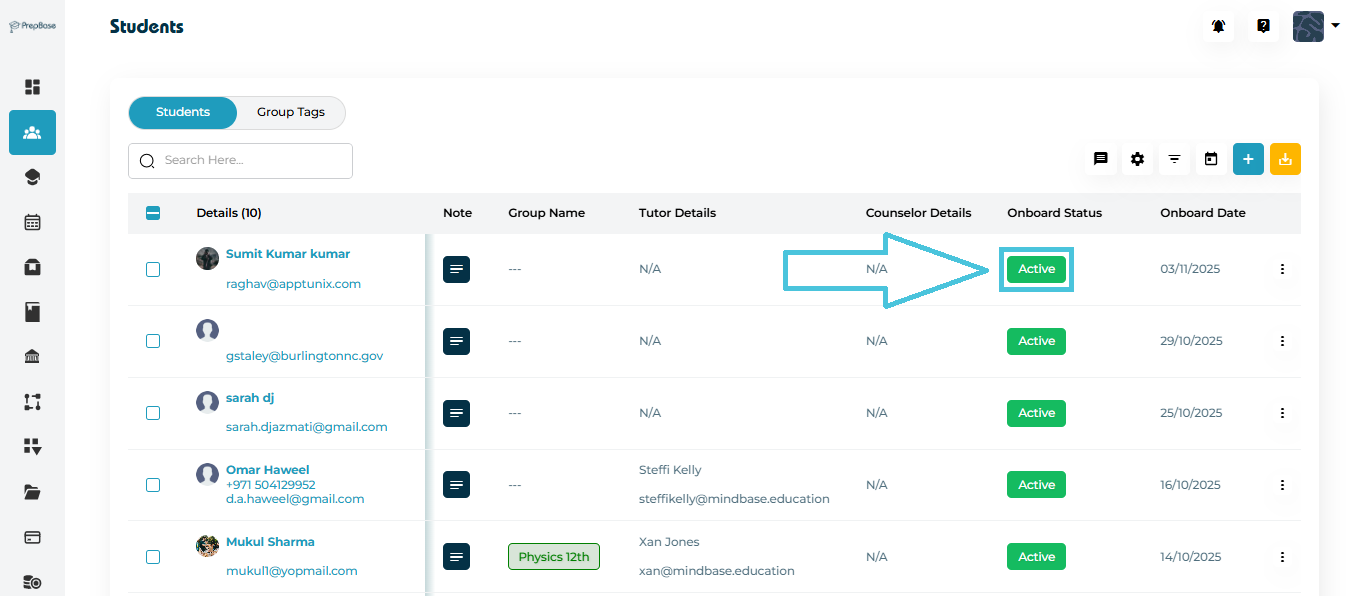
Each student in the system is assigned an Onboard Status, which represents their current state.
This helps Admins quickly identify the account status of every student.
Understanding Status Types
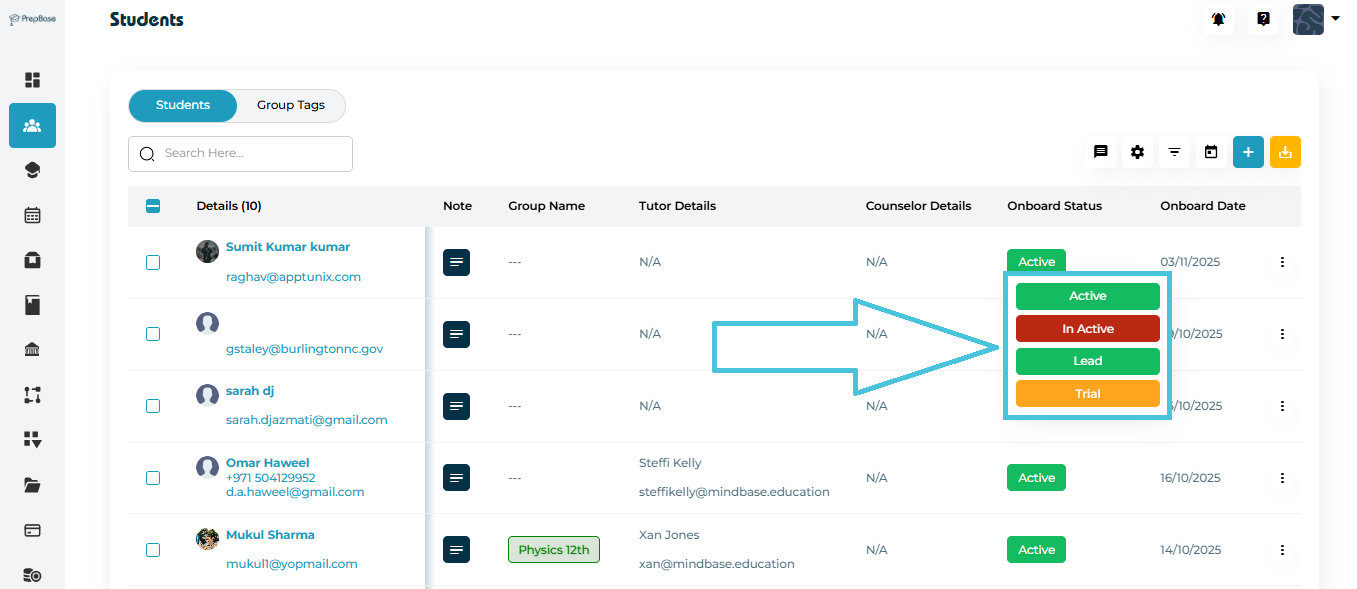
| Status | Description | Color Indicator |
|---|---|---|
| Active | The student is fully onboarded. This is the default state for enrolled students. | 🟩 Green |
| Inactive | The student is no longer active in the system. Admins can reactivate them anytime. | 🟥 Red |
| Lead | Represents a potential or prospective student whose information was added but who has not yet joined any program or package. Useful for tracking new inquiries and follow-ups. | 🟩 Light Green |
| Trial | The student is in a trial or demo stage (for example, attending trial sessions or initial counseling before full enrollment). | 🟧 Yellow |
Changing a Student’s Status
Admins and authorized users can easily update the onboarding status directly from the Student Profiles list:
Locate the student in the list view.
Click the current Status button (e.g., Active).
A dropdown menu will appear with available status options.
Select the desired status — changes are saved instantly and reflected across the platform.

Bulk Email
Steps
After selecting students, click ✉️ → Email.
Enter Subject and Message (rich text editor).
Click Send Email → success message appears.
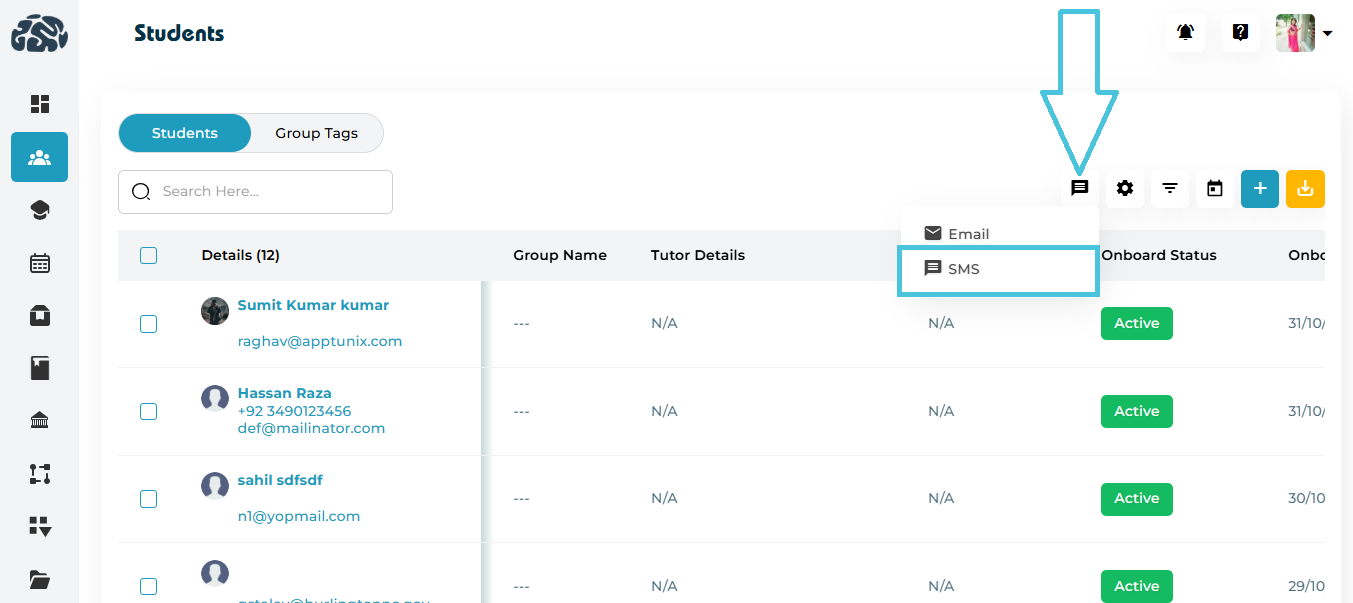
Bulk SMS (currently unavailable)
Steps
After selecting students, click ✉️ → SMS.
Type your Message (plain text).
Click Send SMS → success message appears.
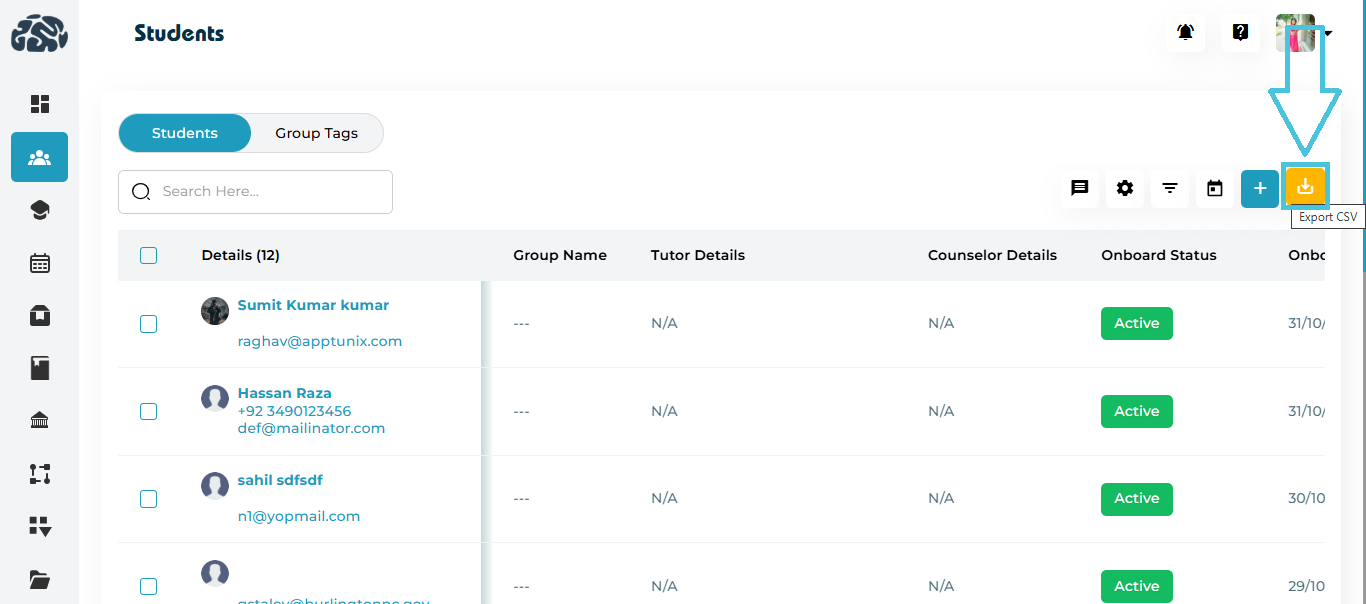
Steps
Apply any filters you need (optional).
Click ⬇️ Export CSV.
The system downloads the current view as a CSV file.
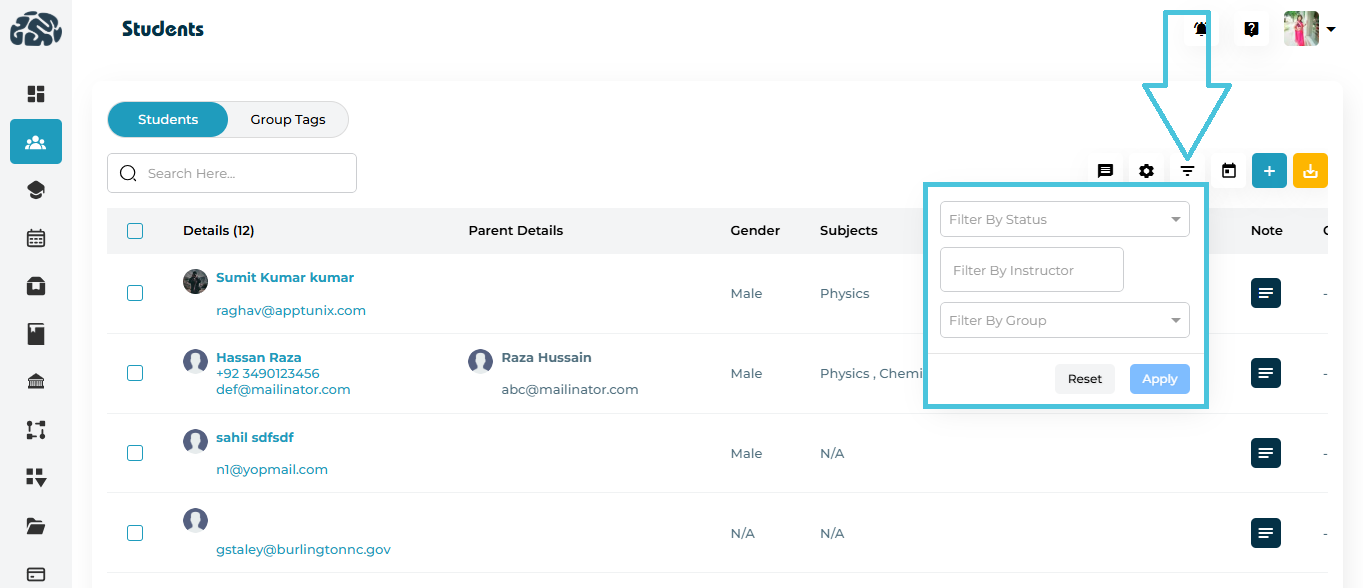
Steps
Click 🔽 Filters.
Select the criteria to filter by Status, Instructor, and/or Group.
Click Apply to update the list (use Reset to clear).
For date range, click 📅 Calendar, pick dates, then Apply.
Click Apply to update results or Reset to clear filters.
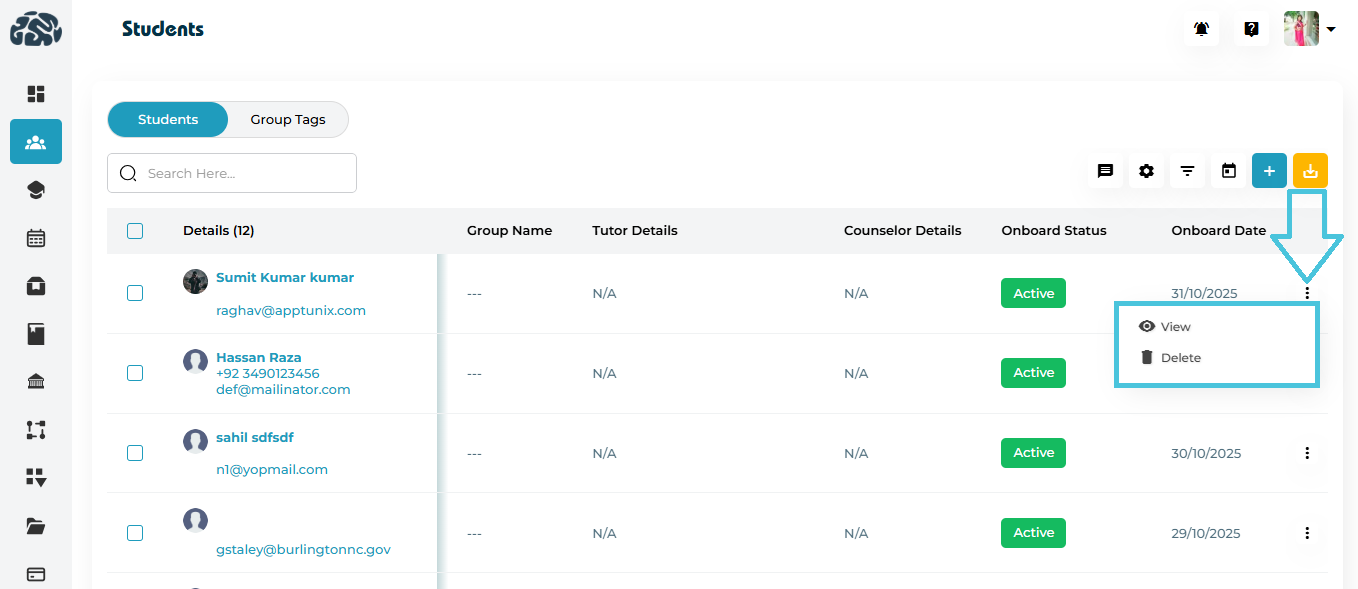
Steps
View: Click ⋮ → View to open full Student Details (tabs for Personal, Family, Academic, Packages, Instructors, Sessions, Files, Notes, To-Do, Projects, etc.).
Delete: Click ⋮ → Delete → confirm prompt to permanently remove the record.